
 11 min read




How to Read Masonry Wall Types Before Starting a Takeoff
A masonry takeoff can go wrong before the estimator measures a single wall. One of the most common reasons is simple: the wall type was interpreted incorrectly. Construction drawings may show several masonry assemblies within the same project. One wall may be an 8-inch reinforced CMU partition, another may combine brick veneer with CMU backup, while another may use architectural block, insulation, an air cavity, and masonry anchors. If an estimator treats all of these walls as the same assembly, the resulting quantities for blocks, brick, mortar, grout, reinforcement, flashing, ties, and accessories can quickly become inaccurate.
That is why experienced estimators first learn how to read masonry wall types across the architectural and structural drawings before beginning the actual masonry takeoff.
This guide explains how to identify masonry wall types, understand wall schedules and details, cross-reference drawings, and determine exactly what should be included in your takeoff.
What Is a Masonry Wall Type?
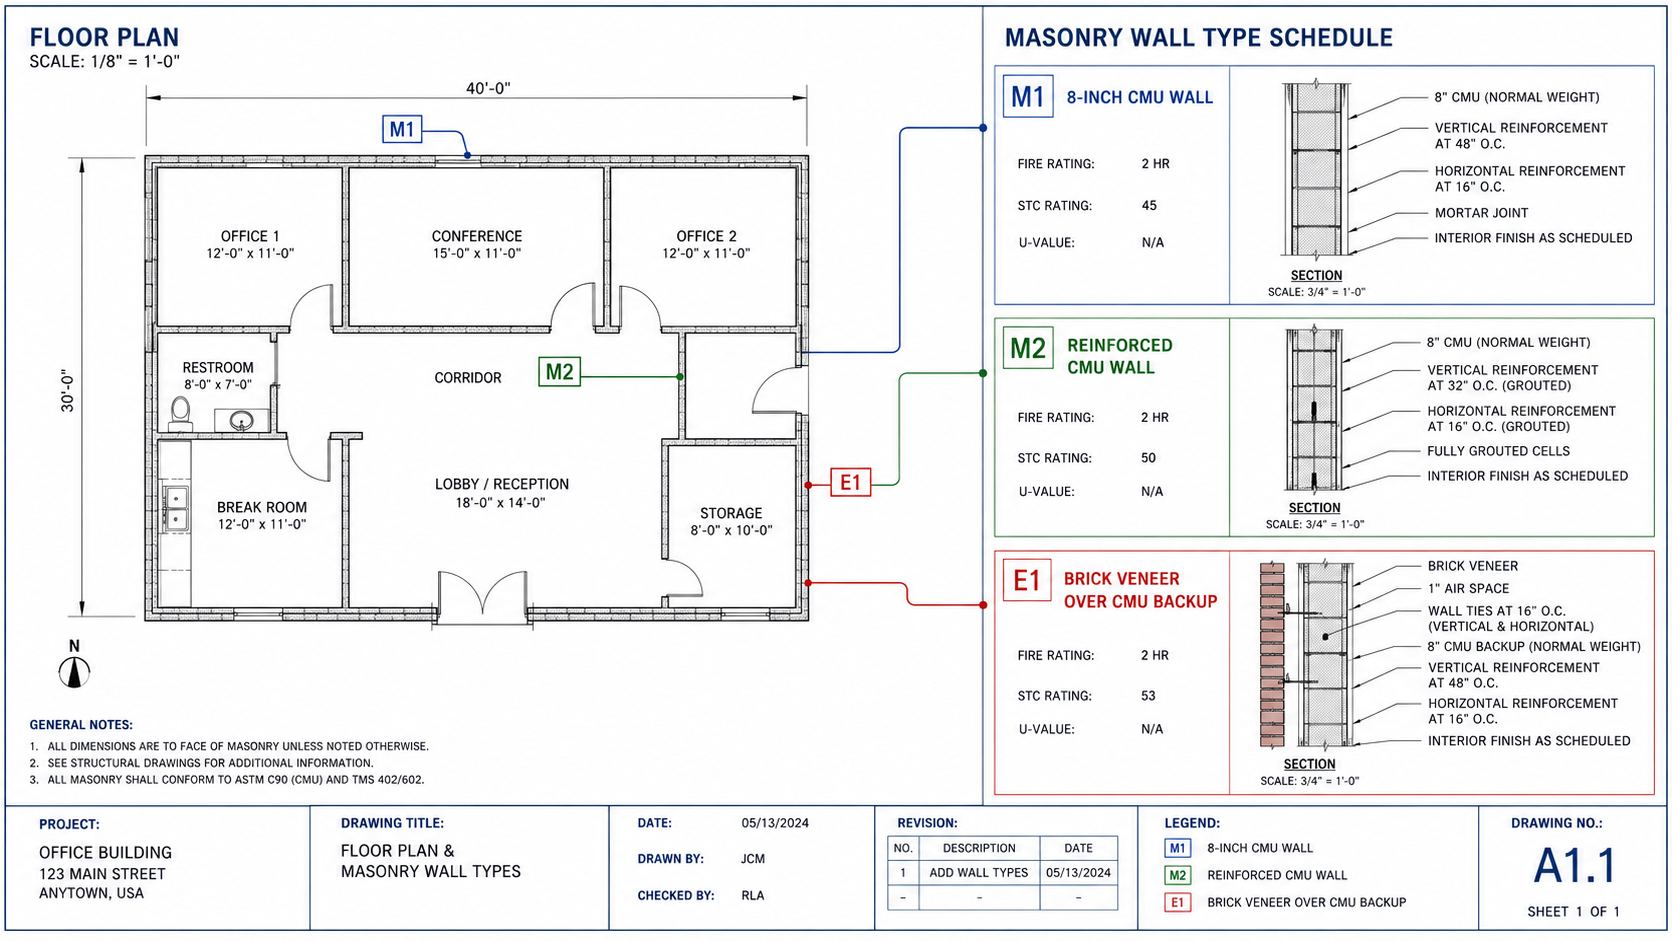
A masonry wall type is a construction designation used on architectural drawings to identify how a particular wall is built. Instead of writing the complete wall assembly beside every wall on the floor plan, architects usually assign the assembly a wall-type code such as:
W1, W2, W3, M1, M2, EW1, or similar project-specific identifiers. The floor plan may therefore show only a symbol such as W4, while the wall-type schedule or wall section explains that W4 consists of an 8-inch CMU wall with reinforcement, insulation, an air space, and brick veneer.
The important point for an estimator is that the wall-type code itself does not tell you enough. You must locate the corresponding schedule, section, detail, and specification information before assigning takeoff materials.
Why Wall Types Matter in a Masonry Takeoff
The same linear footage of wall can require completely different quantities depending on the assembly. Consider two 100-foot-long exterior walls of the same height. The first might consist only of painted 8-inch CMU.
The second might contain:
- 8-inch CMU backup
- Brick veneer
- Mortar
- Grout
- Vertical reinforcement
- Horizontal joint reinforcement
- Wall ties
- Rigid insulation
- Air space
- Through-wall flashing
- Weep vents
Both walls may have the same length and height, but their masonry scopes are significantly different. If you identify only the CMU area and ignore the rest of the wall assembly, the takeoff may look complete while actually missing several major cost items. Correct wall interpretation therefore needs to happen before quantity measurement.
Start With the Architectural Floor Plans
The architectural floor plans are usually the best starting point for identifying where each wall type occurs. Look carefully at the walls and locate wall-type tags. These tags are normally shown beside the wall and may include a number, letter, or combination of both.
For example:
M1 may represent an 8-inch CMU interior wall.
M2 may represent a 12-inch reinforced CMU wall.
E1 may represent a brick veneer wall over CMU backup.
Do not assume what any code means based on previous projects. Wall-type naming conventions are project-specific. Create a list of every wall type that appears within your masonry scope and identify where each type occurs. This becomes the foundation of your takeoff.
Find the Wall Type Schedule
After identifying the wall tags, locate the architectural wall-type schedule. The schedule may appear on an architectural general-information sheet, floor-plan sheet, assembly sheet, or wall-section sheet. A wall-type schedule typically provides information such as wall thickness, framing or backup material, masonry unit size, finishes, insulation, sheathing, cavities, and other assembly components.
For masonry estimating, pay particular attention to references to CMU, concrete block, brick veneer, stone veneer, architectural masonry, structural masonry, and specialty masonry units. You should also note whether the wall is interior or exterior and whether it continues to the underside of the structure, stops above the ceiling, or terminates at another elevation. Wall height has a direct effect on material quantities and labor requirements.
Determine the CMU Thickness and Type
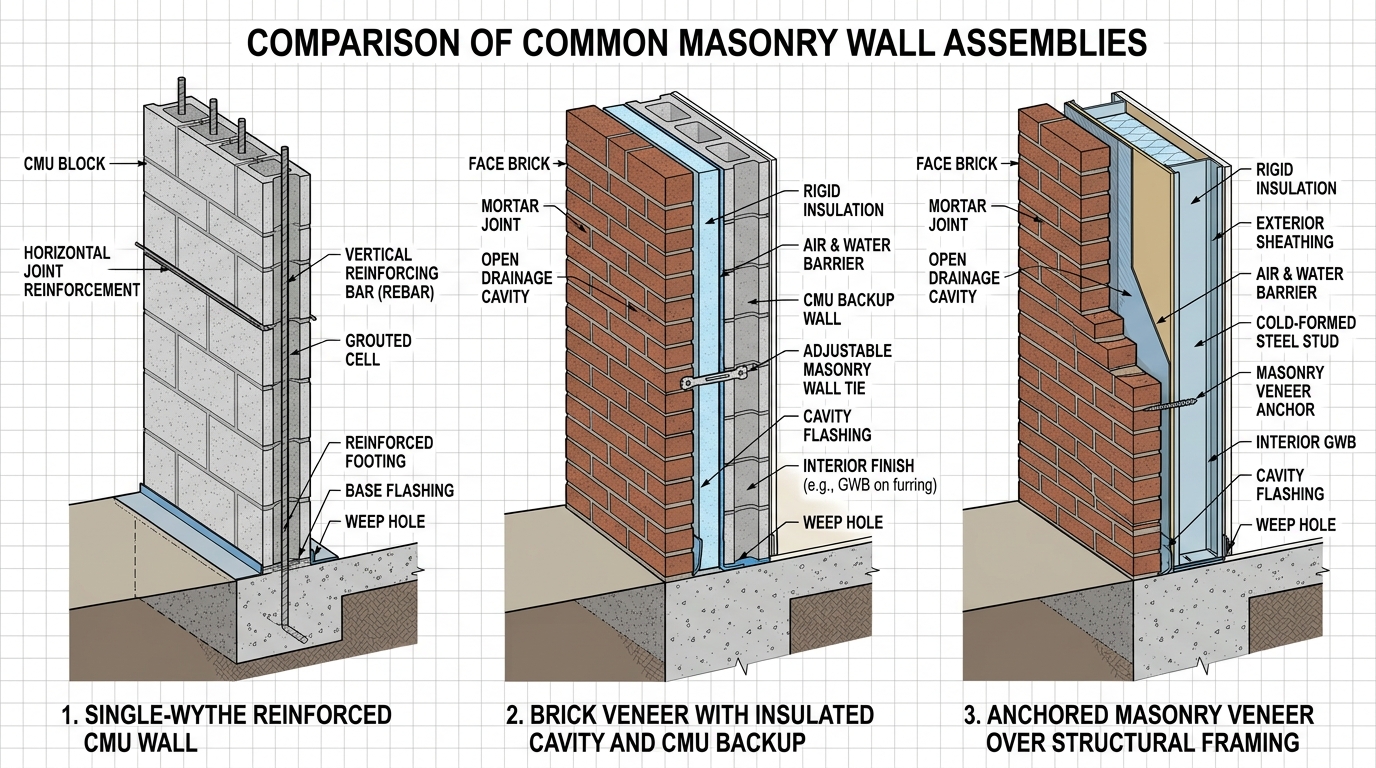
Concrete masonry units are commonly specified in different nominal thicknesses. Typical walls may use 4-inch, 6-inch, 8-inch, 10-inch, or 12-inch CMU. An estimator should never combine these into one generic block quantity. Separate each wall according to its thickness and, when required, its block type. The drawings or specifications may also identify specialty units such as split-face CMU, ground-face block, glazed CMU, lightweight block, bond-beam units, lintel blocks, corner units, or other architectural masonry products. Different blocks can have different material prices and installation requirements, so separating them during takeoff produces a much more useful estimate.
Identify Single-Wythe and Multi-Wythe Assemblies
Some masonry walls consist of only one layer of masonry, while others contain multiple components. A single-wythe CMU wall may include one layer of concrete block with reinforcement and a finish. A cavity wall, on the other hand, may contain exterior brick, an air cavity, rigid insulation, waterproofing or an air barrier, and CMU backup. Anchored masonry veneer can also be installed over structural framing rather than CMU. The estimator must therefore determine which part of the assembly belongs to the masonry scope. If the project contains brick veneer over CMU, both the brick and CMU may need separate measurements even though they occupy approximately the same wall location. Never assume that measuring one wall surface captures the complete assembly.
Cross-Reference the Exterior Elevations
Exterior elevations are especially important for brick, stone, architectural block, and other masonry veneers. The floor plan may tell you where an exterior wall is located, but the elevation often shows where the material actually starts and stops. For example, an elevation may contain brick on the first floor, metal panels above, and stone veneer around the entrance. If you measure the entire exterior wall as brick based only on the floor plan, the brick quantity will be overstated.
Use the elevations to identify transitions between materials, parapet conditions, decorative masonry bands, openings, columns, piers, sills, and other facade elements.
Elevation drawings are also useful for determining wall heights when dimensions are not clearly shown on the floor plans.
Review Wall Sections and Enlarged Details
Wall sections explain the vertical relationship between the components of the wall. They can reveal information that is difficult to understand from the plan alone. A section may show where brick veneer begins above the foundation, how high the CMU extends, whether the wall continues through a roof or parapet, and where insulation, flashing, shelf angles, or coping occur.
Enlarged masonry details can also identify items such as masonry anchors, wall ties, weeps, control joints, expansion joints, flashing, sealants, lintels, and special units. These components may represent relatively small quantities compared with the wall area, but leaving them out can still create significant estimating gaps.
Check the Structural Drawings
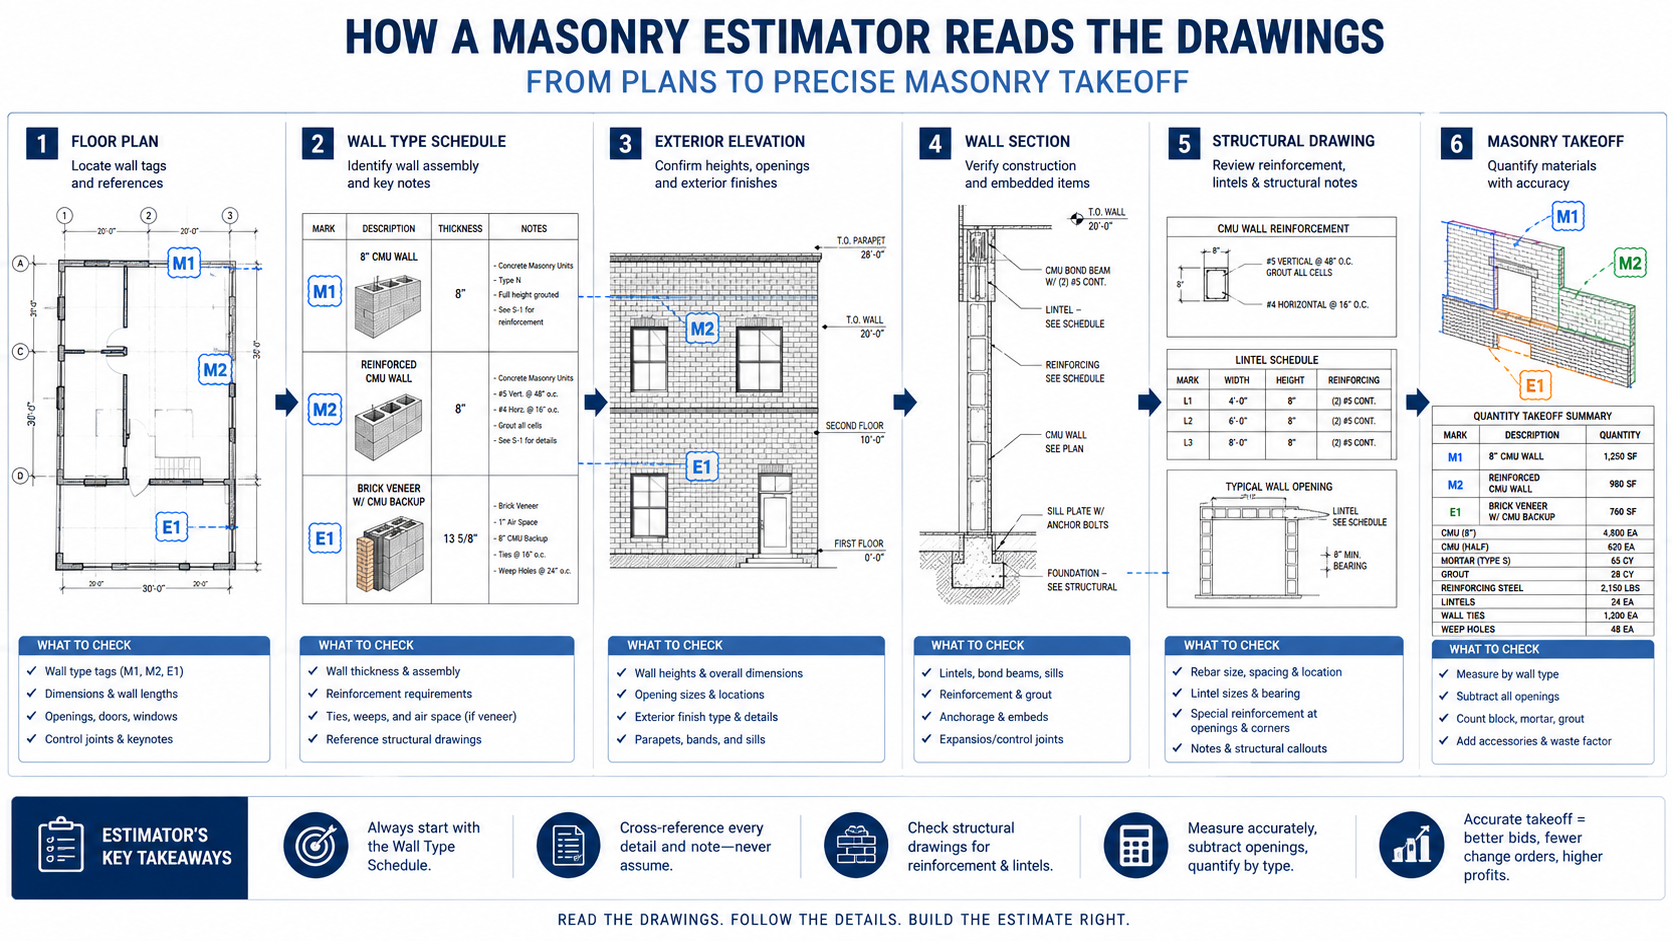
The architectural plans tell you what the wall looks like and where it is located. The structural drawings often tell you how the masonry is reinforced. This distinction is extremely important for CMU takeoffs. Review the structural general notes, masonry notes, wall sections, reinforcing schedules, and lintel schedules. Look for vertical reinforcement requirements such as bar size and spacing. You may see notes indicating reinforcement at 16 inches, 24 inches, 32 inches, or another spacing depending on the design.
Also determine whether the reinforced cells are fully grouted or partially grouted. This information affects both reinforcing-steel quantities and grout quantities. Horizontal reinforcement may also be required through joint reinforcement or bond beams. A complete CMU takeoff therefore requires coordination between both architectural and structural documents.
Pay Attention to Bond Beams and Lintels
Bond beams are commonly used within reinforced masonry walls. The structural drawings may specify bond beams at the top of walls, at floor or roof levels, or at particular vertical intervals.
These locations can require bond-beam block, reinforcing steel, and grout. Openings also require careful attention. Doors, windows, louvers, and large wall penetrations may require masonry lintels or structural steel lintels.
Check the lintel schedule rather than assuming every opening uses the same detail. An estimator should identify opening width, lintel type, bearing requirements, reinforcement, and any associated specialty masonry units.
Separate Brick Veneer From CMU Backup
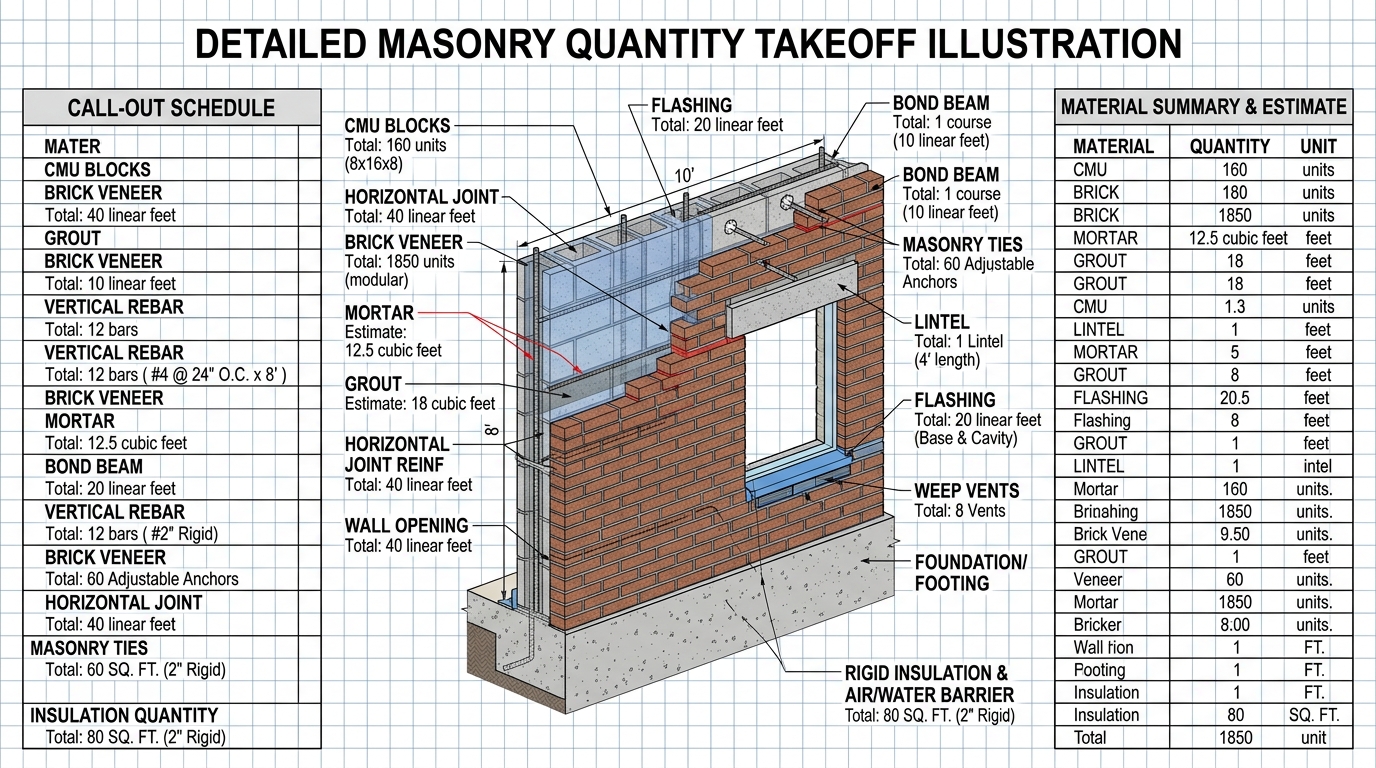
Brick veneer and CMU backup should generally be quantified separately. The brick quantity is based on the net veneer area, while the CMU quantity is based on the backup-wall area. Although these areas may be similar, they are not always identical. Some elevations may contain brick only over selected portions of the CMU wall. Other locations may use stone, architectural CMU, metal panels, glazing, or another exterior finish. The veneer scope may also include masonry ties, anchors, flashing, weeps, mortar, shelf angles, and specialty brick shapes.
Separating the systems makes it much easier to price the project accurately and compare quantities against supplier quotations.
Understand Openings Before Deducting Them
Doors and windows are normally deducted from the gross wall area, but openings should not be treated as simple holes. Every opening can introduce additional masonry work. Depending on the design, you may need lintels, reinforced jamb cells, sill units, flashing, additional anchors, control joints, or specialty brick. Before deducting the opening, understand what happens around it. Large openings can substantially reduce block and brick quantities, while the details around those openings may increase accessory and reinforcement quantities.
Read the Masonry Specifications
Drawings tell you where materials occur, while specifications often provide additional requirements regarding exactly what those materials are. Review the Division 04 masonry specifications for information about masonry units, mortar types, grout, reinforcement, ties, anchors, flashing, accessories, installation requirements, and product standards. The specifications may identify requirements that are not repeated on every drawing.
For example, the drawings may show a generic brick veneer wall while the specification identifies the brick type and mortar requirements. Using drawings without specifications can therefore leave an estimator with incomplete material information.
Build the Takeoff by Wall Type
Once all masonry wall assemblies are understood, organize your takeoff according to wall type rather than measuring every masonry wall as one combined quantity.
For example, separate:
8-inch interior CMU walls.
8-inch reinforced exterior CMU walls.
12-inch structural CMU walls.
Brick veneer over CMU.
Architectural CMU walls.
Stone veneer assemblies.
This structure helps prevent different materials and reinforcement conditions from becoming mixed together. It also makes the takeoff easier to review, price, revise, and compare with the drawings.
Common Wall-Type Mistakes During Masonry Takeoff
One common mistake is beginning measurement before reviewing the wall schedule. Another is relying only on the architectural floor plan without checking elevations and structural drawings. Estimators can also accidentally combine different CMU thicknesses, overlook reinforced cells, miss bond beams, or measure the entire exterior elevation as brick even where other facade materials occur. Another frequent problem is counting only visible masonry units while forgetting supporting components such as mortar, grout, reinforcement, anchors, wall ties, flashing, and specialty units. The best way to avoid these problems is to establish the complete wall assembly first and measure second.
A Better Masonry Takeoff Workflow
Start by reviewing the drawing index, general notes, and Division 04 specifications. Then identify every masonry wall-type tag on the plans. Match each tag with its wall-type schedule. Cross-reference exterior elevations to determine material extents and wall heights. Review wall sections and details to identify cavities, insulation, veneer conditions, flashing, anchors, and terminations. Move to the structural drawings for CMU reinforcement, grout requirements, bond beams, and lintels. Only after completing these steps should you begin measuring wall lengths, areas, openings, and individual masonry components. This process may add a little preparation time at the beginning, but it greatly reduces the chance of having to redo the takeoff later.
When Professional Masonry Estimating Can Help
Large commercial projects can contain dozens of wall assemblies, structural details, elevations, addenda, and masonry conditions. When bid deadlines are tight, reviewing all of these documents while also calculating materials and pricing the work can consume valuable contractor time. Professional masonry estimating services can help by reviewing the project drawings, identifying the applicable masonry assemblies, performing the quantity takeoff, and organizing materials such as CMU, brick, mortar, grout, reinforcement, lintels, flashing, and masonry accessories into a bid-ready estimate. If you need help preparing a masonry bid, explore BidAccurate's masonry estimating services for detailed masonry takeoffs and cost estimates.
Final Thoughts
Reading masonry wall types correctly is one of the most important steps before starting a masonry takeoff. Do not begin by measuring every wall you see. First determine what each wall is actually made of. Review the wall-type schedule, floor plans, elevations, sections, details, structural drawings, and Division 04 specifications together.
Identify the CMU thickness, veneer system, reinforcement, grout, bond beams, lintels, flashing, ties, openings, and specialty units associated with each assembly. Once the wall types are clearly understood, the actual quantity takeoff becomes much easier to organize and much harder to misinterpret. A few extra minutes spent understanding the drawings can prevent hours of corrections—and help produce a masonry estimate that is much more reliable when it is time to submit the bid.