 9 min read




How to Read Wall Type Schedules for a Drywall Takeoff
A drywall takeoff can look simple until the drawings introduce several different wall assemblies. One partition may use a single layer of gypsum board, another may require multiple layers of Type X board, and another may include sound insulation, resilient channel, shaftliner, or special framing. If every wall is measured as the same assembly, the quantities can be wrong before pricing begins.
That is why learning how to read wall type schedules is essential for an accurate drywall takeoff. The floor plan tells you where a wall is located. The wall type schedule, details, and specifications tell you what that wall is made of.
This guide explains how to interpret wall types, connect them to the floor plan, and convert the information into organized drywall and framing quantities.
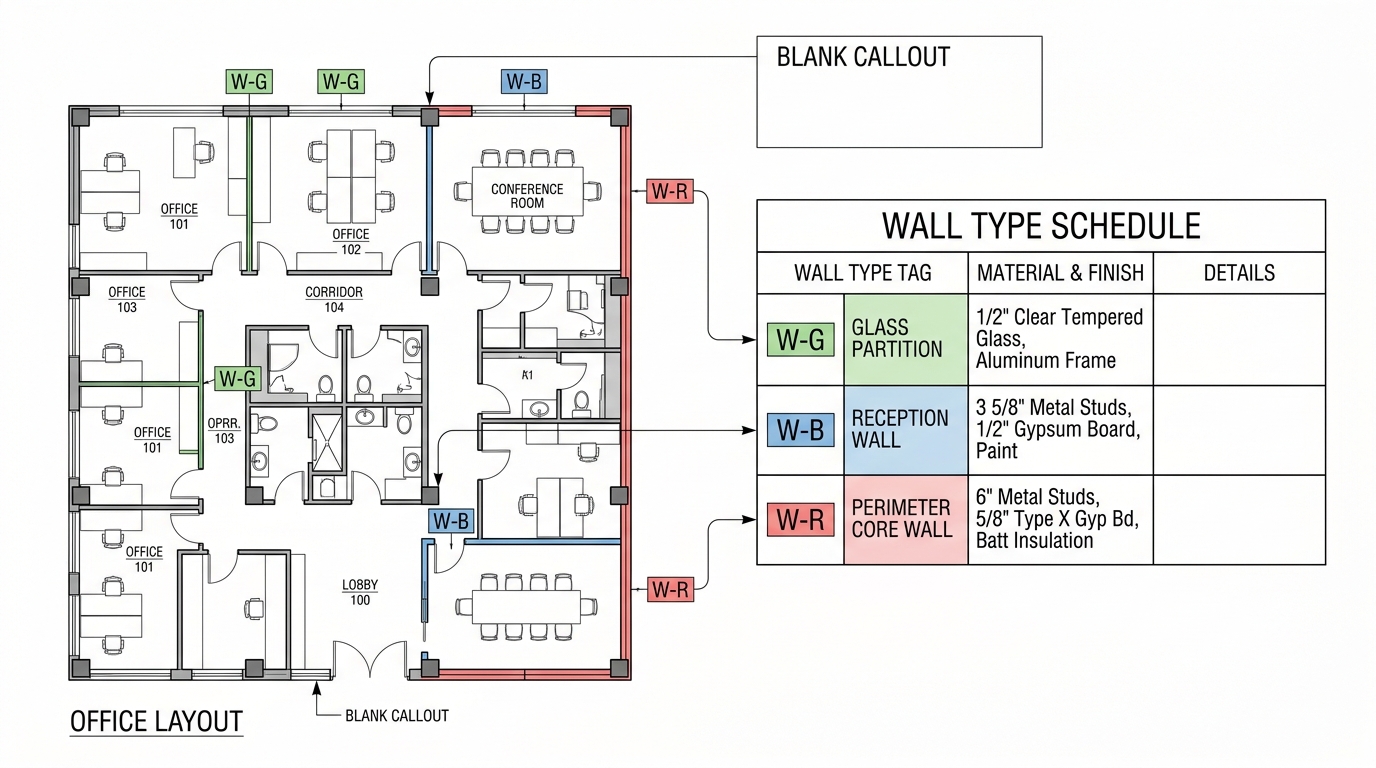
What Is a Wall Type Schedule?
A wall type schedule, sometimes called a partition schedule or wall type legend, identifies the different wall assemblies used on a project. Each assembly is assigned a tag such as A1, W1, or P2, and the same tag appears on the architectural floor plans.
Depending on the project, a wall type may show or reference:
- stud width, gauge, and spacing
- gypsum board thickness, type, and number of layers
- insulation or sound attenuation batts
- fire-resistance and acoustic requirements
- resilient channel, furring, or shaftwall components
- wall height or termination condition
- special notes, sealants, backing, or head-of-wall details
Not every requirement appears in one schedule. Important information may also be found in partition details, reflected ceiling plans, building sections, structural drawings, or Division 09 specifications. Treat the wall schedule as the starting point, not the only source.
Connect the Schedule to the Floor Plan Before Measuring
Before measuring wall lengths, identify every wall type used on each floor.
Find the wall tags on the architectural plans and match them to the schedule. If the project contains W1 through W8, create separate takeoff items for each type instead of combining all partitions into one generic drywall quantity.
This matters because two walls with the same length can require very different materials. A 100-foot standard partition with one layer of board on each side is not equivalent to a 100-foot rated wall with two layers on each side, sound batts, and different framing.
For reviewable quantities, separate the takeoff by wall type, wall height, board type, framing condition, and floor or building area where practical.
How to Decode a Typical Wall Type
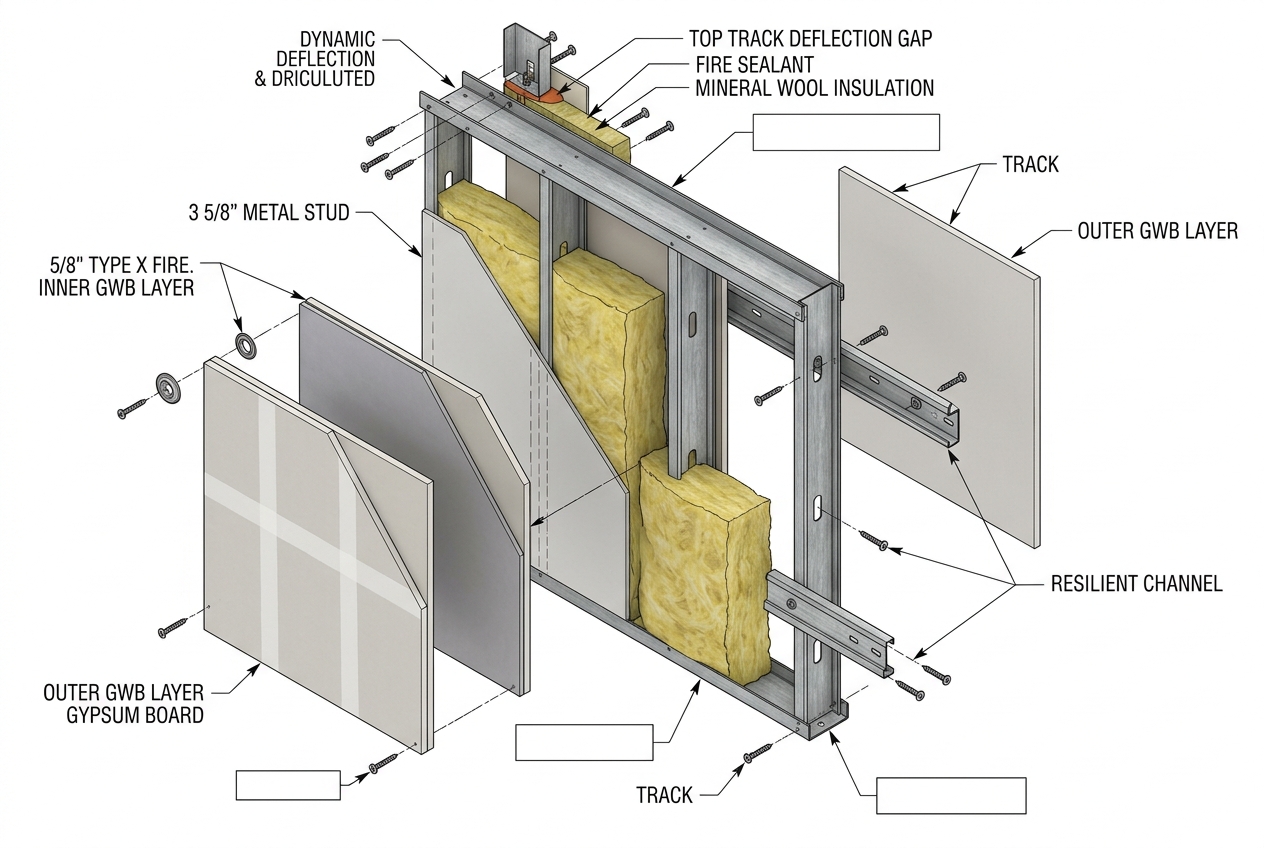
Imagine a wall type that indicates 3-5/8-inch metal studs at 16 inches on center, one layer of 5/8-inch Type X gypsum board each side, sound attenuation batt insulation, and a partition extending to the structure above.
Here is how an estimator should read it.
1. Identify the Framing
Start with the framing system. Look for stud width, spacing, and any specified thickness or gauge.
A schedule may identify 3-5/8-inch or 6-inch metal studs and 16-inch or 24-inch spacing. Heavier framing, jambs, headers, backing, or deflection requirements may be located in details or structural notes.
Keep different stud sizes and framing conditions separate. Standard track, deflection track, bracing, and opening framing should be reviewed rather than hidden inside one generic stud quantity.
2. Read the Gypsum Board on Each Side
Determine what board is installed on Side A and Side B.
Check the thickness, number of layers, board type, whether both sides are the same, and whether the assembly changes above the ceiling. A schedule may require one layer on one side and two layers on the other. Shaft walls and chase conditions can differ even more.
Do not simply multiply every wall area by two. Read the assembly first and calculate the required layers for each side.
3. Confirm Wall Height and Termination
Wall height directly affects board, studs, track, insulation, finishing, and sometimes access requirements.
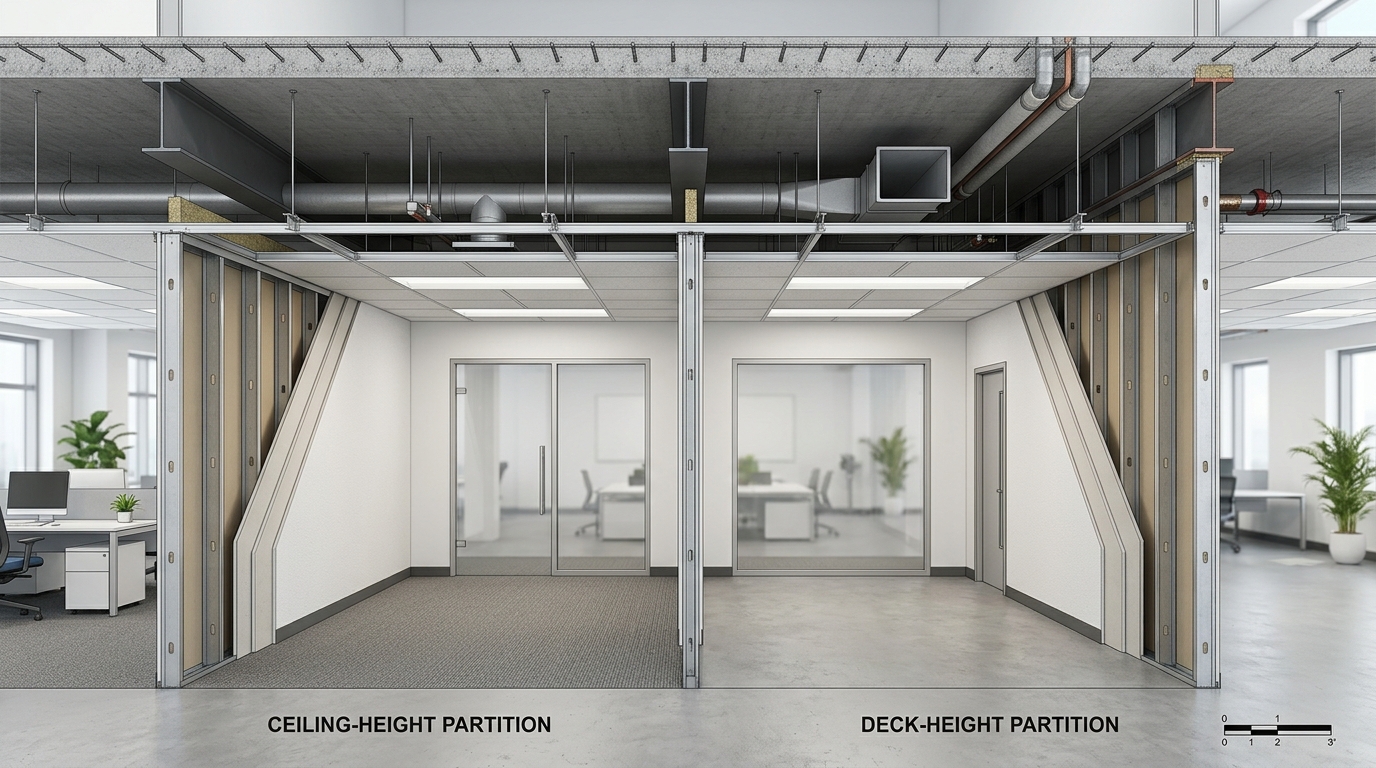
Common conditions include walls stopping at the ceiling, extending above the ceiling, reaching the underside of structure, or running full height to deck or slab. Use reflected ceiling plans, sections, elevations, and structural information to confirm the actual height when the schedule is incomplete.
A wall extending to deck can require far more material than a similar-looking partition that stops above a suspended ceiling.
4. Check Fire-Rated Assembly Requirements
If a wall is fire rated, note the hourly rating and the referenced tested assembly or design.
Do not assume every one-hour or two-hour wall uses the same board configuration. Fire resistance applies to the complete assembly, including the specified framing, gypsum panels, fasteners, spacing, joints, and other required components.
Type X and Type C gypsum board also should not be treated as interchangeable by default. If a listed assembly specifically requires Type C or another proprietary product, the takeoff should follow that requirement.
Separate rated assemblies so board layers, firestopping, head-of-wall details, and related labor can be reviewed correctly.
5. Review Acoustic Requirements
Sound-rated partitions may include sound attenuation batts, mineral wool, resilient channel, isolation clips, acoustical sealant, or multiple board layers.
If an STC target is shown, cross-reference the required assembly and specifications. The materials and construction details used to achieve the acoustic performance are what belong in the takeoff.
6. Read Notes and Detail References
Small notes can create major cost changes. Watch for instructions to extend board to deck, use moisture- or abuse-resistant panels, install resilient channel on one side, provide deflection track, add backing, seal perimeter joints, or firestop rated wall heads.
If a wall tag includes a superscript, note number, or detail reference, follow it before finalizing quantities.
Turning Wall Types into Drywall Takeoff Quantities
Once each assembly is understood, convert the measurements into material quantities.
Start with the total linear footage of each wall type and determine the applicable wall height.
For one wall surface:
Wall area = wall length × wall height
If a W2 wall is 120 feet long and 10 feet high, one side has 1,200 square feet of surface area.
If the assembly has one gypsum layer on both sides, the gross board area becomes 2,400 square feet. If it has two layers on both sides, the required board coverage becomes 4,800 square feet before project-specific deductions and waste allowances.
The same wall length also drives framing quantities. Stud spacing affects stud count, while wall length helps determine top and bottom track. Insulation follows the applicable cavity area, while finishing quantities depend on exposed board surfaces and finish requirements.
Keep gypsum board, studs, track, insulation, resilient channel, shaftwall components, sealants, firestopping, trims, and joint treatment separated where their specifications or pricing differ.
Professional drywall estimating services should be able to trace these quantities back to the wall types and drawings instead of relying on one broad square-foot allowance.
Common Wall Schedule Mistakes in a Drywall Takeoff
Treating Every Wall as the Same Assembly
This can undercount specialty board, insulation, framing, and labor. Measure and report wall types separately.
Missing Different Conditions on Each Side
Not all partitions are symmetrical. Verify the board layers and accessories on Side A and Side B.
Assuming Ceiling Height Equals Wall Height
A 9-foot ceiling does not mean every partition is 9 feet high. Rated, demising, shaft, and corridor walls may continue to deck or structure.
Ignoring Details and Specifications
Schedules often summarize the wall. Details and specifications may define framing thickness, fasteners, sealants, finish requirements, and approved products.
Using Fire Rating as a Material Shortcut
A one-hour label alone is not enough to build a takeoff. Follow the referenced assembly and its components.
Missing Revisions or Hiding Assumptions
Compare the current drawing issue and addenda before bidding. If documents conflict or a wall condition is unclear, document the assumption and raise a clarification or RFI rather than silently guessing.

Wall Type Review Checklist
Before completing a drywall quantity takeoff, confirm for every wall type:
- Where does the wall occur and what is its measured length?
- What is the actual wall height?
- What framing size, gauge, and spacing apply?
- How many board layers are required on each side?
- What board types and thicknesses are required?
- Is insulation included?
- Is the wall fire rated or acoustically rated?
- Are resilient channel, shaftwall, backing, or special tracks required?
- Do notes, details, sections, specifications, or addenda change the assembly?
This turns the wall schedule from a reference sheet into a repeatable estimating workflow.
Why Wall Type Schedules Matter for Estimate Accuracy
Wall type schedules connect plan geometry to actual construction assemblies. Without that connection, a takeoff may measure the correct linear footage while still producing the wrong material quantities.
Wall-type-level measurement also makes supplier pricing easier to compare, identifies specialty materials earlier, and creates a clearer audit trail when plans change.
For large or complex drawing sets, professional quantity takeoff services can help organize the measured scope before labor and material pricing are applied.
Frequently Asked Questions
What Is the Difference Between a Wall Type Schedule and a Floor Plan?
A floor plan shows where walls are located. A wall type schedule explains how tagged wall assemblies are constructed. Estimators use both together: the plan provides location and length, while the schedule and related details provide materials and assembly requirements.
What Does a Wall Type Tag Mean on Construction Drawings?
A wall type tag is a project-specific code that points to a defined wall assembly. A tag such as W1 or P3 has no universal construction meaning; it must be matched to that project's schedule or partition details.
What Drawings Should Be Reviewed for a Drywall Takeoff?
Review floor plans, wall type schedules, reflected ceiling plans, sections, elevations, relevant details, opening information, specifications, and addenda. Structural information may also be needed for heights or framing requirements.
How Do Fire Ratings Affect Drywall Takeoffs?
Fire-rated walls can change board type, layer count, framing, fasteners, head-of-wall conditions, and firestopping. Follow the referenced tested assembly rather than assuming all walls with the same hourly rating are built alike.
Need Help with a Drywall Takeoff?
If your team is bidding a project with multiple wall types, rated assemblies, specialty board, or tight deadlines, BidAccurate can prepare a detailed drywall takeoff with organized quantities and marked-up drawings for review. Explore our drywall estimating services to see how we support contractors and estimating teams.
Final Thoughts
Reading wall type schedules correctly is the foundation of an accurate drywall takeoff. Connect every wall tag to its complete assembly, confirm the height, separate board layers and framing conditions, and cross-check details and specifications before applying quantities.
Following that process consistently makes the drywall estimate easier to price, review, revise, and defend at bid time.